この記事では、App内課金について説明していきます。
下記記事の続きです。
 Expo+ReactNativeの課金①〜App内課金とApp外課金の違いについて
App内課金の実装をしたい方は下記で記載しております。
 Expo+ReactNativeの課金②〜react-native-purchasesでApp内課金をする
LangJournalではクレジットカード決済を導入しております。UI的には下記のようになります。

Stripeを経由して実装しております。StripeではReactNative用のパッケージを用意してくれており(stripe/stripe-react-native)実装はかなり楽にすみます。
また、私はクレジットカード決済しか導入していませんが、他にも下記があるようです。
- 銀行口座引き落とし
- 銀行へのリダイレクト
- 銀行振込
- 後払い
- リアルタイム決済
- 店舗支払い
- ウォレット
参考URL:決済手段について
クレジットカードの決済手数料は3.6パーセントです。App内決済が30%(小規模事業者15%)に比べるとかなり安く感じますね。
このブログでは上の画像のUIを出して、実際にクレジットカードを決済できるところまで紹介します。設定はこのドキュメントに全て書かれていますが、私はすんなりとは実装できませんでした。上ドキュメントと、本記事を両方読みながら、実装を進めていくといいかと思います。
LangJournalの環境
フロント:React Native + Expo
バックエンド:Firebaseのfunctions
ストライプアカウントをここから作成してください。
サーバー側
サーバーサイドの必要パッケージのインストールをします。
npm i stripeフロント側
ReactNativeの必要パッケージのインストールをします。
yarn add @stripe/stripe-react-nativeStripe の初期化
App.tsxファイルをStripeProviderで囲います。
import { StripeProvider } from '@stripe/stripe-react-native';

// 中略
  return (
    <StripeProvider
            // 開発環境の時は、試験モードで実行したいので、「pk_test_・・・・」から始まるKeyを設定します
            // 本番環境は「pk_live_・・・」から始まるKeyを設定します
            publishableKey={
        __DEV__
          ? process.env.TEST_STRIPE_PUBLBISHABLE_KEY!
          : process.env.ADMIN_STRIPE_PUBLBISHABLE_KEY!
      }
    >
      // ここにコードを書く
    </StripeProvider>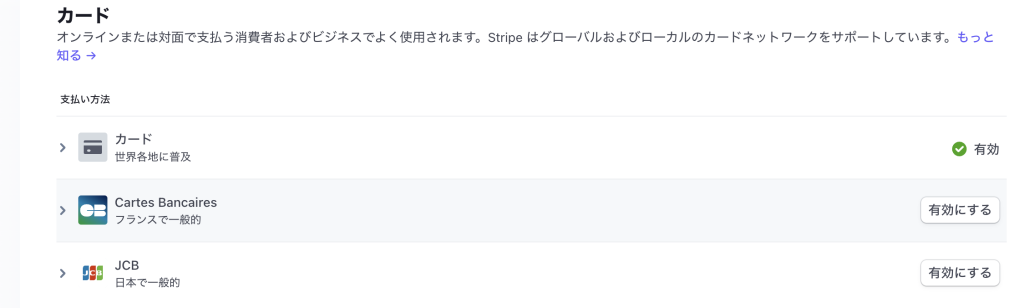
);Stripeの設定をします。決済手段の設定を表示して、1つ以上の決済手段を有効にする必要があります。
今回はカード決済だけですので、下記のようになればOKです。
サーバー側の実装です。
import * as functions from 'firebase-functions';
import * as dotenv from 'dotenv';
import Stripe from 'stripe';

interface Props {
  isDebug: boolean;
  stripeCustomerId: string | null;
  amount: number;
  currency: string;
}

module.exports = functions
  .region('asia-northeast1')
  .https.onCall(async (data: Props, context) => {
    dotenv.config();

    // ストライプの初期化をします。開発用と本番用かはFlagで分けています。
    const stripe = new Stripe(
      (data.isDebug
        ? process.env.STRIPE_TEST_SK_KEY
        : process.env.STRIPE_ADMIN_SK_KEY) as string,
       // バージョンの指定は必ず指定しなければいけません。
      { apiVersion: '2022-11-15' },
    );

    try {
      let customerId;

      // 初回の購入か、2回目の購入かで処理を分けます。
      if (data.stripeCustomerId) {
        // 2回目以降
        customerId = data.stripeCustomerId;
      } else {
        // 新規作成の場合
        const customer = await stripe.customers.create();
        customerId = customer.id;
      }

      const ephemeralKey = await stripe.ephemeralKeys.create(
        {
          customer: customerId,
        },
         // ここも同じくバージョンの指定が必須です。
        { apiVersion: '2022-11-15' },
      );
      const paymentIntent = await stripe.paymentIntents.create({
        amount: data.amount,  // 料金: 1000円の場合、1000
        currency: data.currency, //単位: jpy, usdなど
        customer: customerId, // カスタマーID
        automatic_payment_methods: {
          enabled: true,
        },
      });

      return {
        paymentIntent: paymentIntent.client_secret,
        ephemeralKey: ephemeralKey.secret,
        customerId,
      };
    } catch (error) {
      functions.logger.log('=========ERROR=========');
      functions.logger.log(error);
      return;
    }
  });
React Native側の実装です。

必要な箇所を抜粋します。
import { useStripe } from '@stripe/stripe-react-native';
import { httpsCallable } from 'firebase/functions';

const { initPaymentSheet, presentPaymentSheet } = useStripe();

useEffect(() => {
  const f = async () => {
    const response = await httpsCallable(
      functions,
      // 3:エンドポイントを追加するで作成したonPaymentSheetを呼び出します。
      'onPaymentSheet',
    )({
      isDebug: __DEV__, // 検証環境
      amount: 153, // 153円
      currency: 'jpy', //単位は円
      stripeCustomerId: null, //初回の場合null
    });

    const { paymentIntent, ephemeralKey, customerId } = response.data as {
      paymentIntent: string;
      ephemeralKey: string;
      customerId: string;
    };

    const { error } = await initPaymentSheet({
      merchantDisplayName: 'LangJournal',
      customerId: customerId,
      customerEphemeralKeySecret: ephemeralKey,
      paymentIntentClientSecret: paymentIntent,
      allowsDelayedPaymentMethods: true,
    });
  };

  // 補足:customerIdを保存しておくと、2回目以降はstripeCustomerIdに値を設定できます

  f();
  // eslint-disable-next-line react-hooks/exhaustive-deps
}, []);

const onPressSubmit = useCallback(async () => {
   // 上添付画像のクレジット画面入力のフォームを呼び出します
  const { error } = await presentPaymentSheet();
}, []);

return <Button title={'会員になる'} onPress={onPressSubmit} />;4まで無事できたら、試験してみましょう。
クレジットカード番号 4242 4242 4242 4242 と、任意の有効期限、セキュリティーコード、郵便番号を使用してクレジットカードフォームに入力します。支払いが完了できたらOKです。
以上です。詰まったところや、疑問点ありましたら、コメントいただいたらできる限り回答したいと思います。私もかなり詰まったので、こちらの記事が次開発する人の役に立てたら幸いです。

LangJournalは、日記を書くことで英語やフランス語などの外国語を学べるアプリです。英語学習に興味がある方や、私が開発したこのアプリに関心を持っている方は、ぜひインストールしてお試しください。
LangJournalのサイトはこちら
